3PAR OS UPGRADE 3.1.3 – PART 2 UPGRADE DAY
Upgrade day was here I packed my lucky rabbit foot and headed into the office. Please note the screen shots below were taken during the last upgraded I posted about as I forgot to take any this time, the process was almost identical but obviously the version numbers you are going to see will differ from those in the screenshots. About an hour before the upgrade was due to begin I completed the following pre-upgrade steps and checks.
PRE-UPGRADE
- Check CPU and port usage is below 50%. statcpu -iter 1, statport -iter 1
- Suspend tasks. setsched -suspend_all, check tasks are suspended as expected showsched
- Check for any DO activity. showtask –active, for any tasks that are active canceltask taskID
- Stop system reporter by visiting the machine its installed on and stopping the Windows service
![]()
- Check for any connected users who may be making changes to the system showuserconn
- Check the connectivity of hosts before the upgrade. showhost –pathsum, I took a screenshot of this so I could verify connectivity was as before after the reboot of the first node
- Verify health is OK to do upgradecheckhealth –svc
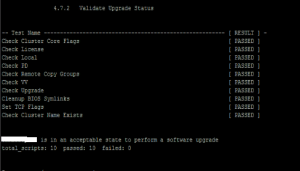
- Check the system is ready for upgrade checkupgrade
- Plus I suspended all backups so the system was as quiet as possible
TIMINGS
Next it was time to hand over to HP. The high level steps and expected timing was as follows:
Updating New codes on the service Processor – 60 Minutes (non-intrusive, can be performed in advance)
Performing the pre-upgrade checks – 30 Minutes (non-intrusive)
Node Upgrade to the new InForm OS – (15 Minutes per node) + 5 pause time = 40 minutes
Performing Post Upgrade Check and patch installations – 30 Minutes (non-intrusive)
Drive cage and Drive Firmware update – 110 Minutes for 7 cages (will be run as a background task & monitored till completion (non-intrusive)
UPDATING THE SERVICE PROCESSOR
The HP engineer first downloaded the update for the Service Processor and Inform OS. Next he disabled alerting in the Service Processor and chose to run the Service Processor update ISO. This stage was completed quite quickly and next he moved onto loading the Inform OS to the Service Processor.
HEALTH CHECKS
Next was the health checks, again we moved quite quickly through this as I had ran most of them myself before the upgrade. In addition to the checks I ran above he also ran the following commands:
showsys –d, showversion –a –b, showpd –failed –degraded, shownet, showalert, shownode, showcage, showbattery, showport –d
NODE UPGRADE
The Inform OS update had already been loaded to the Service Processor so the next stage was to stage the new code to the controllers. This was achieved by connecting through SSH to the Service Processor and running a bunch of commands to transfer the files. When the upgrade was kicked off I took a handful of screenshots to show roughly what happens.
Frist the upgrade goes through some pre-upgrade checks
Next the staged software appears to be transferred so it is ready to be actively installed
![]()
Next node 0 reboots and picks up the new code
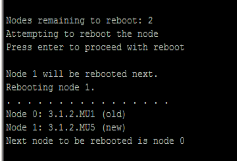
There is then a pause between reboots of the nodes during which HP will allow you to check all looks OK. I checked our alerting software, checked all VM’s were still online and ran a showhost –pathsum to check that all paths and accessibility to nodes was OK. Before the last node reboots HP are able to roll the upgrade back in an online manner, once the last node has been upgraded this must be done offline. All looked good in my case so I let the upgrade continue.
POST UPGRADE CHECKS
Once both nodes were upgraded the HP engineer then ran the following checks shownode, showversion a – b, and then re-enabled scheduled tasks with setsched -resume_all
CAGE AND DRIVE FIRMWARE UPGRADE
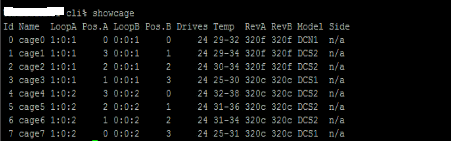
Next it was time to upgrade the firmware of the cages, this was kicked off with the command starttask upgradecage –a. To check the task was running the following commands were run: showtask –active and then we were able to drill down for more details by running showtask –d taskID. Progress was also monitored by running showcage. In the screenshot below you can see that about half the cages were done at this stage with half on 320f and half on 320c (you can see this in the RevA and RevB column).
Once the cage firmware upgrade is completed it’s time to upgrade the firmware of the disks. Showpd –failed –degraded, those disks that require a firmware upgrade will show as degraded. To kick off the disk firmware upgrade run admithw. Progress can again be monitored though showtask and re-running Showpd –failed –degraded. To do all the disks and cages in our 7 cage system took about 1.5 hours.
Admithw appears to recreate the default CPG’s. I don’t like these to be there in case someone accidentally adds a VV to them so I did a showcpg to double check they contained no VV’s and then removed them with removecpg
FINAL TASKS
I then ended the remote session with the HP engineer and next set about updating all the attached Windows 2008 and 2012 Servers to host persona 15. Setting the host persona to 15 presents LUN’s in the manner which Windows expects and the good news is this means the application of KB2849097 is no longer part of the upgrade process. To set each Windows host to persona 15 I ran the following command:
sethost –persona 15 servername
Once this was done I set about the following final tasks:
- Kicked backups off again
- Restarted system reporter service on system reporter service
- Checked for new alerts showalert –n
- Check the hosts path showhost –pathsum
- Ran a checkhealth
- Checked all VM’s were online without issues
- Checked our monitoring software
- Updated software – CLI and management console. This was again downloaded from HP’s FTP site and was a simple case of just clicking next through the install wizard.
That’s was it successfully onto 3.1.3, interestingly once you are on 3.1.3 you can perform your own upgrades without HP having to install the software for you. This new process is explained in this excellent post by Bart Heungens.
Further Reading:
HP 3PAR OS Upgrade Pre-planning Guide
HP 3PAR Windows Server 2012 and Windows Server 2008 Implementation Guide
If you missed the first part of the series catch it here.
3PAR OS UPGRADE 3.1.3 – PART 1: PRE-UPGRADE PLANNING
I have been updating one of our 3Par systems to 3Par OS 3.1.3 MU1. This short series of posts will cover the process to successfully upgrade a 3Par system to 3.1.3
There are a number of pre-upgrade tasks that need completing before an upgrade can begin these are listed below under two categories host based tasks and SAN based tasks.
A) HOST TASKS
1 Check compatibility of components – This is to ensure that you are running a tested configuration of components that have been proven to work together by HP. There are 2 ways to go about this. Firstly you can use SPOCK. This site contains all the compatibility information you will need to complete your own checks. Or you can complete a host worksheet and return it to HP who will then verify the compatibility of all your components and firmware versions. The components you need to check are fairly standard to any SAN upgrade – Server OS, multipath software, HBA’s and fabric switch firmware versions. I was lucky I didn’t need to update any firmware versions in order to proceed.
2 Check load balancing is set to round robin – This is a requirement for any Windows servers running 2008 and using the native MS MPIO driver. I used a script to make this step quicker.
I used the Microsoft command line application mpclaim to view the multipath configuration. Specifically I ran mpclaim –s –d from the command line.
To run the command line on multiple servers remotely without having to logon I used psexec. You can download it from here . Here is an excellent article on how to use it: psexec guide
In this case I used it in the following way
A Choose the server you want to run the script from and create a folder on it called C:scripts. Copy psexec to this folder
B in C:scripts create a file called 3par_servers.txt. Populate this with a list of the servers you wish to check for multipath configuration
C Also in C:scripts create a batch fie called mpclaim.bat and enter the following command line into it mpclaim –s –d
D Finally, open a command line from the machine you wish to run the script on, change directory to C:scripts and then enter c:Scripts>psexec -c -f @C:scripts3par_servers.txt C:scriptsmpclaim.bat
E You should then see the window populate with the information you require. An example of the output is below:
\Server1
C:Windowssystem32>mpclaim -s -d
For more information about a particular disk, use ‘mpclaim -s -d #’ where # is the MPIO disk number.MPIO Disk System Disk LB Policy DSM Name
——————————————————————————-
MPIO Disk5 Disk 6 RR Microsoft DSM
MPIO Disk4 Disk 5 RR Microsoft DSM
MPIO Disk3 Disk 4 RR Microsoft DSM
MPIO Disk2 Disk 3 RR Microsoft DSM
MPIO Disk1 Disk 2 RR Microsoft DSM
Check LB policy appears as RR for all volumes.
3 Windows MPIO Patches. Two patches needed applying to each Windows server running MS MPIO we had attached to the 3Par. The patches which are to ensure correct functioning of MS MPIO, in my case we pushed these out using WSUS.
- KB275704 needs to be applied to Windows Server 2008, and 2008 R2
- KB2821052 needs to be applied to Windows Server 2012 and Windows Server 2008 R2
B) SAN TASKS
The SAN tasks were much quicker than the host checks I just needed to check the following three things
1 Performance – The 3Par needs to be upgraded at a time of low utilisation, this is defined as the load on the CPU’s and ports being below 50% utilised.
- Check CPU utilisation. statcpu -t -d 15 -iter 1 Must be less than 50%
- Check port utilisation. statport -d 15 -iter 1 -ni
For each port, the average I/O, Kbytes per sec, needs to be less than 50%. The official documentation showed the following figures:
200,000 Kbytes per sec, for 4 Gb connections
400,000 Kbytes per sec, for 8 Gb connections ie less than 50%
2 Version Check – I just ran checkversion from the CLI and then checked in HP 3PAR Operating System Upgrade Pre-Planning Guide that the current version was on the upgrade path and if there were any special considerations .
3 Health Check – The system needs to be in a healthy state to allow an upgrade to go ahead so I ran a checkhealth from the command line and all came back healthy. If you do find any items flagged by the checkhealth you will need fix these items before proceeding with the upgrade.
That was all the pre upgrade tasks done so I went ahead booked in the upgrade with HP as only from releases post 3.1.3 onwards will the systems be customer upgradable.
Follow 3ParDude on Twitter here
ADAPTIVE FLASH CACHE – DEEP DIVE
Last week I posted a quick overview of the latest feature announced for 3Par – Adaptive Flash Cache. HP have provided me with some more detailed documents regarding HP Adaptive Flash Cache technology and so today I wanted to take a more in-depth look into it.
Caching 101
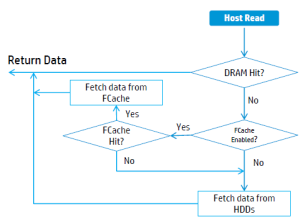
Let’s start at the beginning, cache is traditionally memory that acts as a buffer between IO requests and disk, temporarily storing data to reduce the service time of requests. The cache will contain a mixture of write requests that are waiting to be destaged to disk and data related to reads that have recently been requested or prefetched using a read ahead algorithm. Each read or write request that arrives at the SAN will first check if the data is in cache and if it finds it this is called a cache hit. The response time to the host will be significantly quicker than if the data had been retrieved from disk, this behaviour is shown in the diagram below.

Why Flash Cache?
Cache has traditionally been provided by DRAM memory which whilst providing the quickest response times is expensive and so is limited in size in most controllers. OK so we want a bigger cache to maximise cache hits and minimise response time, but DRAM is expensive so enter flash the saviour of every one of us!

OK not Flash Gordon, but enter flash cache technologies which allow a caching area to be extended by utilising SSD’s. SSD cache will not provide the same performance as DRAM cache but it is much cheaper and can therefore be scaled larger economically. The aim of flash cache is simple, to expand the size available to cache and to thus increase the volume of data stored increasing the chances of a cache hit reducing response time.
HP’s Answer
3Par had a hole in its armour given that the competition has long had flash cache available as part of their storage systems. HP has now plugged this gap with a technology it is calling HP Adaptive Flash Cache. A standard 3Par provides DRAM memory within the controllers for caching as the DRAM starts to become full data is flushed to disk so it is no longer available to cache. In a system enabled with Advance Flash Cache the DRAM will continue to be the primary cache for the system however when the DRAM becomes 90% full instead of the data being flushed to disk it will destaged to the SSD’s in the system, future host I/O will be redirected and served from flash cache. Data is selectively destaged from DRAM to Advanced Flash Cache in 16Kb pages. The pages rejected from being admitted to the Advanced Flash Cache are those that are least likely to produce a hit and include I/O larger than 64KB, sequential read/writes plus data that is already stored on SSD.
A write will continue to be serviced in exactly the same way as above even with an AFC (Advanced Flash Cache) implementation as it is only read data that can be read from AFC. The AFC is used by writes only to invalidate data not for retrieval.
We can see the process with reads is where it gets interesting. When a read request is received DRAM is still used as the primary cache and is checked first, next the AFC is checked and if the data is present on the SSD’s a cache hit is registered and the data does not need to be serviced from spinning disk.
Flushing data from the SSD’s that has been placed there by AFC occurs through a LRU (Least recently used) algorithm. When data arrives in the AFC it is admitted at normal temperature it will be promoted to hot when data is accessed frequently and marked cold as it eventually ages and will then be subject to eviction from flash cache. So to summarise what we are seeing here is essentially a tiered cache system, DRAM is used as primary cache, then destages to AFC which then further destages to spinning disk as data becomes cold. The take home benefit from all of this is a larger cache providing improved response times for random read workloads.
The good thing compared to other offerings like EMC’s FAST cache is that the SSD’s used by AFC don’t need to be dedicated to cache they be used in a standard manner for storing data as well.
Managing Flash Cache
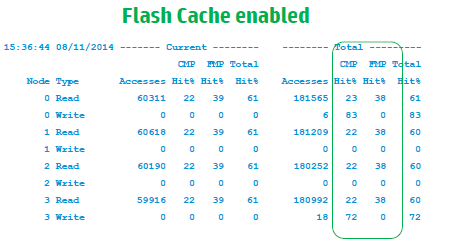
If you’re thinking this all sounds great but is it any good for me the handy thing is HP have built in a simulation mode which doesn’t even require any SSD’s present in the system. Simulation mode allows you to look at your cache stats and see if AFC would be beneficial to your system. The output below is from one of new statcache commands available, the FMP (flash cache memory page)column represents AFC and a hit rate here of zero would suggest that all cache requirements are already been covered by internal DRAM cache. A good candidate would have a hit rate in AFC equal to the on-board cache or greater.
AFC utilises RAID 1 logical disks and the recommendation is that it is striped across all available SSD’s to maximise performance. Initially managing AFC will be via the CLI only with management console support to follow. What is neat is that AFC can be enabled system wide or on specific volumes. If you go down the specific volumes route you apply the settings via virtual volume sets. This essentially allows you to prioritise important volumes by including only them in virtual volume sets with access to flash cache.
To find virtual volumes that are good candidates for AFC the recommendation is to use a mix of cache statistics and vlun stats for identification. The ideal candidates will be vluns with high read requests but low cache hits demonstrating it’s a random workload.
AFC can co-exist with all current 3Par features including adaptive optimisation.
Sweet so how do I get it!
AFC will be available from 3Par OS 3.2.1, will be included as part of the base OS and you will need a mixture of SSD’s and spinning disk. The 7000 series will need a minimum of 4 SSD drives and will support up 768GB per node pair. The 10,000 series will need a minimum of 8 SSD drives and will support up 2TB per node pair.
Final Thoughts
So today we have seen that you can never have too many Flash Gordon pictures in any post, plus HP have added to its already strong line up another key feature. Adaptive Optimisation has always performed well for me and does a good job of moving hot data that has a predictable workload to faster disks however you could be left lagging behind with random read workloads. AFC will plug this gap plus the reduced backend load will in turn also benefit write requests.
HP 3PAR CLI command list
shownode
showcage -d
showsys -space
compactcpg -dr cpgname
showalert - show status of system alerts
showauthparam - show authentication parameters
showbattery - show battery status information
showblock - show block mapping info for vvs, lds, pds
showcage - show disk cage information
showcim - show the CIM server information
showclienv - show CLI environment parameters
showcpg - show Common Provisioning Groups (CPGs)
showdate - show date and time on all system nodes
showdomain - show domains in the system
showdomainset - show sets of domains in the system
showeeprom - show node eeprom information
showeventlog - show event logs
showfirmwaredb - show current database of firmware levels
showhost - show host and host path information
showhostset - show sets of hosts in the system
showinventory - show hardware inventory
showiscsisession - show iscsi sessions
showld - show logical disks (LDs) in the system
showldch - show LD to PD chunklet mapping
showldmap - show LD to VV mapping
showlicense - show installed license key
shownet - show network configuration and status
shownode - show node and its component information
shownodeenv - show node environmental status (voltages,temperatures)
showpatch - show what patches have been applied to the system
showpd - show physical disks (PDs) in the system
showpdata - show preserved data status
showpdch - show status of selected chunklets of physical disks
showpdvv - show PD to VV mapping
showport - show Fibre Channel and iSCSI ports in the system
showportarp - show ARP table for ports
showportdev - show detailed information about devices on a Fibre
Channel port
showportisns - show iSNS host information for ports
showportlesb - show Link Error Status Block information about devices
on Fibre Channel port
showrcopy - show remote copy configuration information
showrctransport - show information about end-to-end transport for remote
copy
showrsv - show information about reservation and registration of
VLUNs connected on a Fibre Channel port
showsched - show scheduled tasks in the system
showsnmppw - shows SNMP access passwords
showsnmpmgr - show SNMP trap managers
showspace - show estimated free space
showspare - show information about spare and relocated chunklets
showsshkey - show ssh public keys authorized by the current user
showsys - show system information (system name, serial number etc.)
showsysmgr - show system manager startup state
showtarget - show unrecognized targets
showtask - show information about tasks
showtemplate - show templates
showtoc - show system Table of Contents (TOC) summary
showtocgen - show system Table of Contents (TOC) generation number
showuser - show user accounts and SSH keys
showuseracl - show user access control list
showuserconn - show user connections
showversion - show software versions
showvlun - show virtual LUNs (VLUNs) in the system
showvv - show virtual volumes (VVs) in the system
showvvmap - show VV to LD mapping
showvvpd - show VV distribution across PDs
showvvset - show sets of VVs in the system
checkhealth - perform checks to determine overall state of the system
checkpassword - display authentication and authorization details
checkport - perform loopback test on fc ports
checkpd - perform surface scan or diagnostics on physical disks
checkld - perform validity checks of data on logical disks
checkvv - perform validity checks of virtual volume administrative
information.